Whether you’re crafting for your team, a cheer mom supporting her daughter, or a small business maker, this project makes a fun, professional-looking bow. And thanks to the SVGArts template you get—with stripes, arrow tails, and a printable PDF guide—you’ll be well-equipped.
Why use this template?
Here are some of the reasons this particular file stands out:
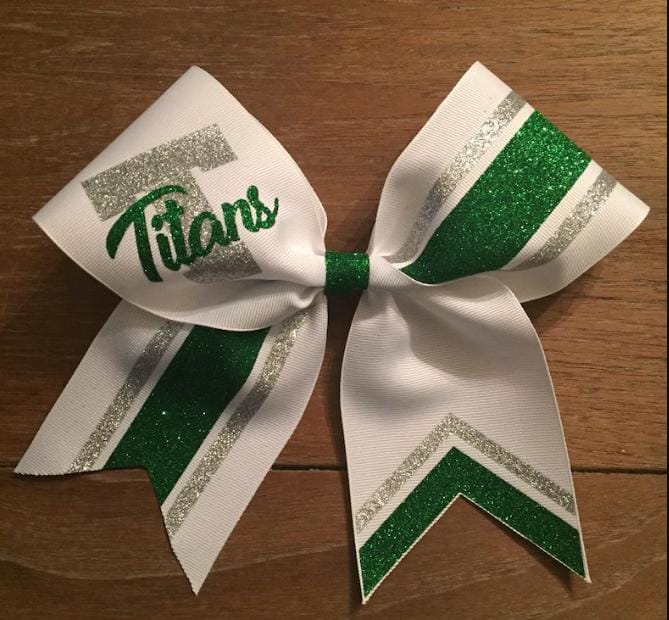
- It’s specifically set up for 3″ grosgrain ribbon—which means common ribbon size for cheer bows. The stripes in the template measure 3″ wide × 12″ tall.
- It includes double arrow tails matching that 3″ width—giving a professional and dynamic “tail” look.
- The file comes in multiple formats (SVG, EPS, DXF) so you can use with cutting machines like Cricut or Silhouette.
- Plus: It includes a free printable PDF guide (DIY Cheer Bow Guide) so you’re not left guessing how to align your ribbon and tails.
What you’ll need
Here’s a list of materials you’ll want to gather before you begin:
- 3″ wide grosgrain ribbon (approximately 30″ length recommended) — pick your team colour or favourite combination.
- Heat transfer vinyl (HTV) in the colour(s) of your choice—this is for using the template stripes / arrow tails.
- A cutting machine that accepts SVG/EPS/DXF files (Cricut, Silhouette, etc).
- A cable tie (5 / 8″ suggested) or small hairband/elastic to secure the center.
- A glue gun & sticks (or hot glue) to secure parts that need reinforcement.
- Double sided tape (for additional hold if you wish).
- Optional: A clip or hair-bow pin if you intend to attach the finished bow to a wearer.
Step-by-Step Instructions
Here’s how to turn the template into a gorgeous cheer bow:
- Download & Prepare the Template Once you purchase the SVGArts template, download your files (SVG, EPS, DXF, plus the PDF guide). Import the SVG into your cutting software (e.g., Cricut Design Space). Resize if needed—though the template is already set for 3″ wide ribbons.
- Cut the Vinyl for Stripes and Arrow Tails Use the template to cut the heat transfer vinyl stripes and arrow tail shapes. You’ll likely cut vinyl pieces sized to match the 12″ tall stripe and 3″ wide tail width. Align with your ribbon colour(s). Tip: If your team uses two colours (for example navy and gold), you might cut stripes in one colour and arrow tails in another for a layered effect.
- Heat Transfer Vinyl Application Pre-prepare your ribbon (iron flat if needed). Place the vinyl stripe pieces onto the 3″ ribbon portion at the 12″ length. Then arrange the arrow tails at the bottom. Use a heat press or iron (as appropriate for your HTV) to apply the vinyl following manufacturer instructions.
- Assemble the Ribbon Bow
Once your ribbon has the vinyl applied and is cooled/flattened, move into the assembly:
- Take your 30″ length of 3″ ribbon.
- Fold or loop it into the bow shape you prefer (classic loops, layered loops, etc).
- Use the 5/8″ cable tie (or hair elastic) to cinch the center and hold the loops in place.
- Adjust loops for evenness and tail length.
- Attach Arrow Tails & Secure Use your glue gun (or double sided tape for lighter hold) to secure the arrow tail pieces behind the bow loops, making sure they hang freely and clearly. Position them at the back so they show the arrow shape.
- Finish the Center & Add Clip Wrap a small piece of ribbon around the center cable tie/elastic to cover the band, glue it at the back. Attach your desired clip/pin to the back (alligator clip, French barrette, etc) so the bow is wearable.
- Final Finishing Touches Give the bow a once-over: make sure vinyl stripes are fully adhered, tails hang evenly, loops are puffed out nicely. Trim any loose threads or glue strings. Optionally, you can press lightly again to flatten and set the vinyl fully.
Tips & Ideas to Elevate Your Bow
- Use team colours: If you’re making bows for a specific cheer squad, match the ribbon and vinyl to the team palette.
- Add glitter vinyl or metallic foil HTV for extra sparkle (especially for competition or seniors).
- Experiment with ribbon finishes: grosgrain is standard, but you could layer a sheer organza ribbon behind for more volume.
- Customize with initials or mascot logos: After applying the base stripes and arrow tails, you could add a small HTV letter or mascot silhouette at the center of the bow.
- Consider the scale: While the template is 3″ wide (a common “standard” size), you can adapt the same method for other widths if you modify the SVG—but keep loop proportions consistent.
Why This Template Makes It Easier
Rather than measuring and drawing your own layout every time, the SVGArts template gives you a reliable, pre-sized layout optimized for 3″ ribbon and arrow tails. This reduces guesswork, speeds up production, and ensures consistency if you’re making multiple bows (for a team, sale inventory, etc). The built-in printable guide also helps with alignment so you don’t mis-place stripes or tails.
Final Thoughts
Creating a cheer bow with purpose and polish doesn’t have to be complicated. With a well‐designed template like the SVGArts “Stripes & Arrow Tails” file in hand, you’ve got a solid foundation. Combine quality ribbon, crisp vinyl, and careful assembly—and you’ll have a bow that stands out on the sideline and lasts. Whether you’re crafting one for your daughter’s next game, outfitting an entire team, or building an inventory of handmade bows to sell—I hope this process leaves you feeling confident, creative, and ready to boost that cheer spirit!
We also have many design with the cheer spirit in mind, these designs make great gifts for cheer moms, cheer friends, and cheer coaches! Cheer Mom, Love Cheering, All Cheer No Fear, Spirit Club, and for another great Christmas Gift, Peace, Joy, and CHEER.